
Author
Amber Baele
Associate Scientist, Flow Cytometry
Author
Amber Baele
Associate Scientist, Flow Cytometry
Welcome to our third Flow Matters blog post! In the first post we introduced the fundamentals of flow cytometry and its utility for clinical trials. In the second post, we explored how this technique is applied in the development pipeline for CAR-T cell immunotherapies in oncology. Next, we will explore the process behind creating a well-designed flow cytometry assay. It isn’t just enough to have the tools and the vision; craftsmanship is required to turn that vision into reality. If our assay is not properly tailored to fit our needs or is improperly validated, then we can’t reliably interpret the data and produce the needed clinical insights.
In this post, we’ll walk through the key principles of designing effective flow cytometry assays for clinical use. We won’t just walk through the theoretical steps of assay design, though; we’ll also share practical insights drawn from our experience in a clinical lab setting.
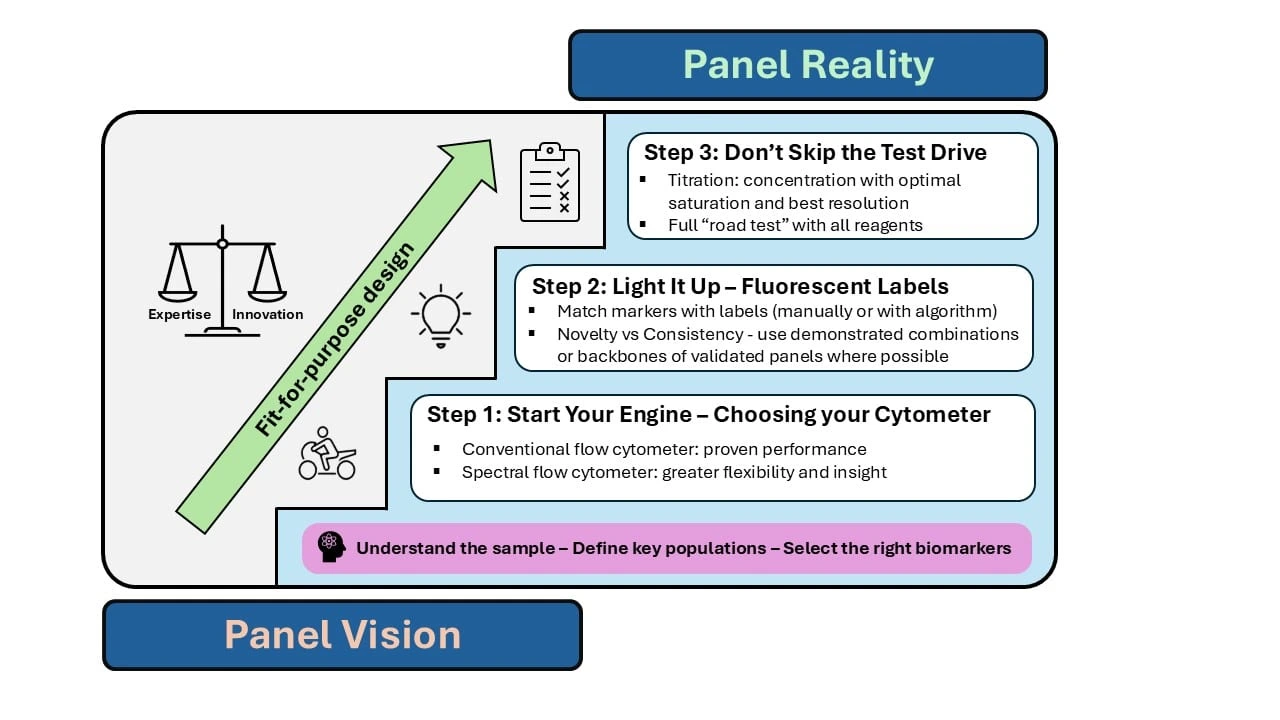
At Cerba Research, we approach flow cytometry assay design with the mindset of fit-for-purpose: each assay should be molded to reflect the design of the study and the needs of the investigators, of which no two are exactly alike.
Regardless of the context, the design of every flow cytometry panel should start with the same foundation: a clear scientific question. The best way to come up with that question, in practice, is often to start by interrogating yourself as the designer. If we can’t answer basic questions about our samples and our experimental system, we can’t expect our panel to either!
First, we need to clearly understand the type of sample we’re working on and who that sample is coming from.1 The disease state of the patient and their clinical treatment will directly influence the cellular composition and characteristics of the sample. For example, in CAR-T cell monitoring it’s essential to know the specific cancer being treated, the type of CAR-T cell being used, how those cells are being manufactured, and which cellular interactions are important for therapeutic efficacy (i.e., tumor immunosuppression of CAR-T cells via PD1/PD-L1 signaling). All of these factors will inform our choices during assay design, namely, deciding which cell populations and behaviors we need to track and which biomarkers will be most effective at tracking them.
Naturally, the next question becomes, “What are your populations of interest?” Identifying the specific cell types or cell subsets relevant to your hypothesis is essential. Which broad categories of cells need to be identified (i.e., T-cells, myeloid cells)? Which specific types of cells do we need to parse from these categories (i.e., exhausted T-cells and myeloid-derived suppressor cells) and shed a spotlight on? Identifying these priorities early creates an experimental framework that can be very useful for making decisions about marker and label pairing later.
Of course, after identifying our populations of interest, we should next ask: Which biomarkers will produce the most accurate identification and classification of these populations? Biomarker choice is a question that our team always considers, even in cases where the set of markers is determined in advance by a sponsor. Understanding which markers are expected to be co-expressed by the same cells, for instance, is essential to make sure that we assign these markers spectrally distinct labels. Similarly, knowing the expected cellular dynamics of a marker (whether it is intracellular or extracellular, stable or labile, etc.) affects the staining protocols and panel layout. Lastly, perhaps most important is knowing the expected density of each marker on each cell type: highly expressed proteins often perform best when matched with low-brightness labels, while low-abundance targets require brighter ones to ensure accurate detection. We’ll touch on this specific area again later!
After answering all these questions, much like buying a car, we next must select the right “make and model” for our panel and tailor the features to fit the needs we’ve identified.
A great panel isn’t just about the markers; it’s about how well they match your machine.
In general, we have two types of instruments at our disposal for flow cytometry: conventional and spectral flow cytometers. Each has their own benefits and shortcomings for clinical flow cytometry, which we will more thoroughly discuss in a future post, and their utility comes down ultimately to the application.
In brief, conventional cytometers are an excellent choice for clinical applications where the list of biomarkers is already well refined, regulatory requirements are strict, and consistency is crucial. Their standardized configurations make it easier to integrate into validated lab workflows and quality-controlled environments. Spectral flow cytometers, on the other hand, allow for more flexible panel design and deeper profiling by virtue of their enhanced ability to discern spectrally similar fluorochromes. This increased power gives them a higher ceiling for the number of markers that can be built into an assay, which is especially useful when sample volume is limited (for example, blood from children or bone marrow aspirate or cerebrospinal fluid). They are well-suited for larger, exploratory panels aimed at gathering as much information as possible from a sample to inform future studies. That said, implementing spectral flow cytometry in a clinical setting does come with unique challenges. The technology is still relatively new, and while it’s evolving quickly, workflows, reagent validation, and lab standardization are still being refined.2
In short: conventional flow cytometers offer proven performance; spectral flow cytometers promise greater flexibility and insight. Choosing the right system means balancing current needs with future potential.
Now that we’ve chosen our instrument, it’s time to bring the panel to life by picking the best fluorescent labels to pair with our biomarkers.
Think of it like a love story; success depends on the characteristics and chemistry of both partners. There are countless fluorochromes available, each with unique traits: brightness, spectral spillover, stability, and size all play a role. On the marker side, we already discussed some of the important principles earlier (co-expression patterns, density, and cellular localization), and this step is where they come from. The goal is to find pairs that complement each other and balance our overall mixture of labels and markers to produce the best possible blend.1,3
Historically, finding that blend required a lot of manual calculation and searching. These days, there are tools available that can perform that process much faster (i.e., Fluorofinder4,5, EasyPanel). These offer helpful suggestions and are a great place to start, especially for designing a panel from scratch. However, in practice, getting the blend just right still requires refinement and iteration from us as scientists.
For instance, where an online tool may choose newer or more exotic fluorescent dyes that look more ideal on paper, it may be more efficient and reliable to use fluorochrome combinations that already have demonstrated consistent performance across previous assays. It is also common practice for most clinical labs to prioritize reagents that are sourced from well-known vendors and made in large batches (called lots) to ensure consistent availability and reliable performance in routine workflows.
Additionally, in some cases, a similar panel may already exist for the same disease area or target population. Rather than designing a completely new panel, it can be useful to adapt and build on the existing basic markers, called the backbone of the panel. This approach offers the advantage of continuity, especially when the previous panel has already been optimized and shown to produce robust data.
We see panel design not just as a technical challenge but as a strategic decision. We balance the promise of innovation with the power of experience.
Now that we’ve designed our “perfect panel,” it’s essential to test it before applying it to patient samples. Even the most carefully planned panel can behave differently in practice.3 A key step in this process is determining the right antibody concentration, often referred to as titration. If the antibody-fluorochrome combination has been used successfully on the same population before, we can typically use the same concentration, as its performance is already proven. However, if it’s a new combination, we’ll need to test different concentrations to find one that fully labels our target cells (optimal saturation) and most distinctly identifies them from unstained cells (best resolution). We’ll then combine the optimal concentration of each reagent together to do a full “road test” of the panel on a representative sample.
Interpreting the results of these experiments goes beyond simply selecting the concentration with the best individual performance, though. It’s about understanding how each fluorochrome interacts with the others in the panel. For instance, a cell type might express more of a certain biomarker than expected during testing, causing increased spillover into other channels and subsequent decreases in the resolution of other markers. In such a case, it may be necessary to use a “suboptimal” concentration or reassess our pairings altogether to maximize the overall panel performance.
In short: trust in your panel design but always verify the performance before you start using it!
Thank you for joining us on this brief journey through the process of designing a flow cytometry panel! Next time, we’ll go through some case studies of how this process works in the real world of clinical studies. We’ll also be revisiting and going more in-depth on the individual steps of this process in future posts, so stay tuned!
References:
Leveraging technologies for efficiencies
Transforming clinical trial logistics through smart automation and RFID technology
The AACR Annual Meeting, held in San Diego, California, from April 17-22, offered a valuable snapshot of where oncology research is heading and how emerging advances are translating into real-world clinical application. As one of the most influential gatherings for the global cancer research community, the meeting brought together translational scientists, clinicians, industry leaders, and patient advocacy groups to share new data, ideas, and perspectives.
Welcome to another edition of the Flow Matters blog. We’re diving into how flow cytometry is transforming virology and vaccine research and how new technological advances are giving researchers an unprecedented view of the immune system in action.